
by Sarah K Perlman | Jun 19, 2023 | Branding, Content Creation, Customer Experience, Marketing, Social Media, Video
Is it possible to have a favorite marketing funnel? I guess so, because mine is the RACE framework. It was created by Dr. Dave Chaffey, cofounder of Smart Insights, in 2010. The goal was to create a framework that shows how to create and implement a successful digital marketing plan. It can be used by any size business in either the B2B or B2C space, making it super versatile.
RACE stands for reach, act, convert, and engage. (There’s an additional stage—plan—at the beginning, but PRACE just doesn’t have the same ring to it.) Each stage relates to a different part of the customer journey and identifies the marketing activities needed. The framework helps marketers plan their digital marketing efforts and optimize them using data. Optimization relies on the feedback from key performance indicators (KPIs) at each stage.
The reason this is my favorite marketing funnel is pretty simple. It’s action-oriented and provides tactics that any marketer can use on a business’ website and social media channels. It also emphasizes building relationships with customers while guiding them on their journey. Relationship building is my favorite part of interacting with customers, so I find the RACE framework really valuable.
Stage 0: Plan
During the planning stage, you’re creating the overall digital marketing strategy. The RACE framework focuses on inbound marketing efforts—the content you create and publish—as opposed to outbound campaigns. The planning stage is when you create your branded content for each stage of the funnel and decide the channels you’ll publish on. This is also the time to select the KPIs that matter most to you. You’ll use these to measure your success and optimize your strategy by making tweaks to it.
Stage 1: Reach
The top of the funnel is where you want to increase your audience’s awareness of your brand and its products or services. At this stage, the buyer is exploring their options in the market—they might not even know they have a problem that needs solving.
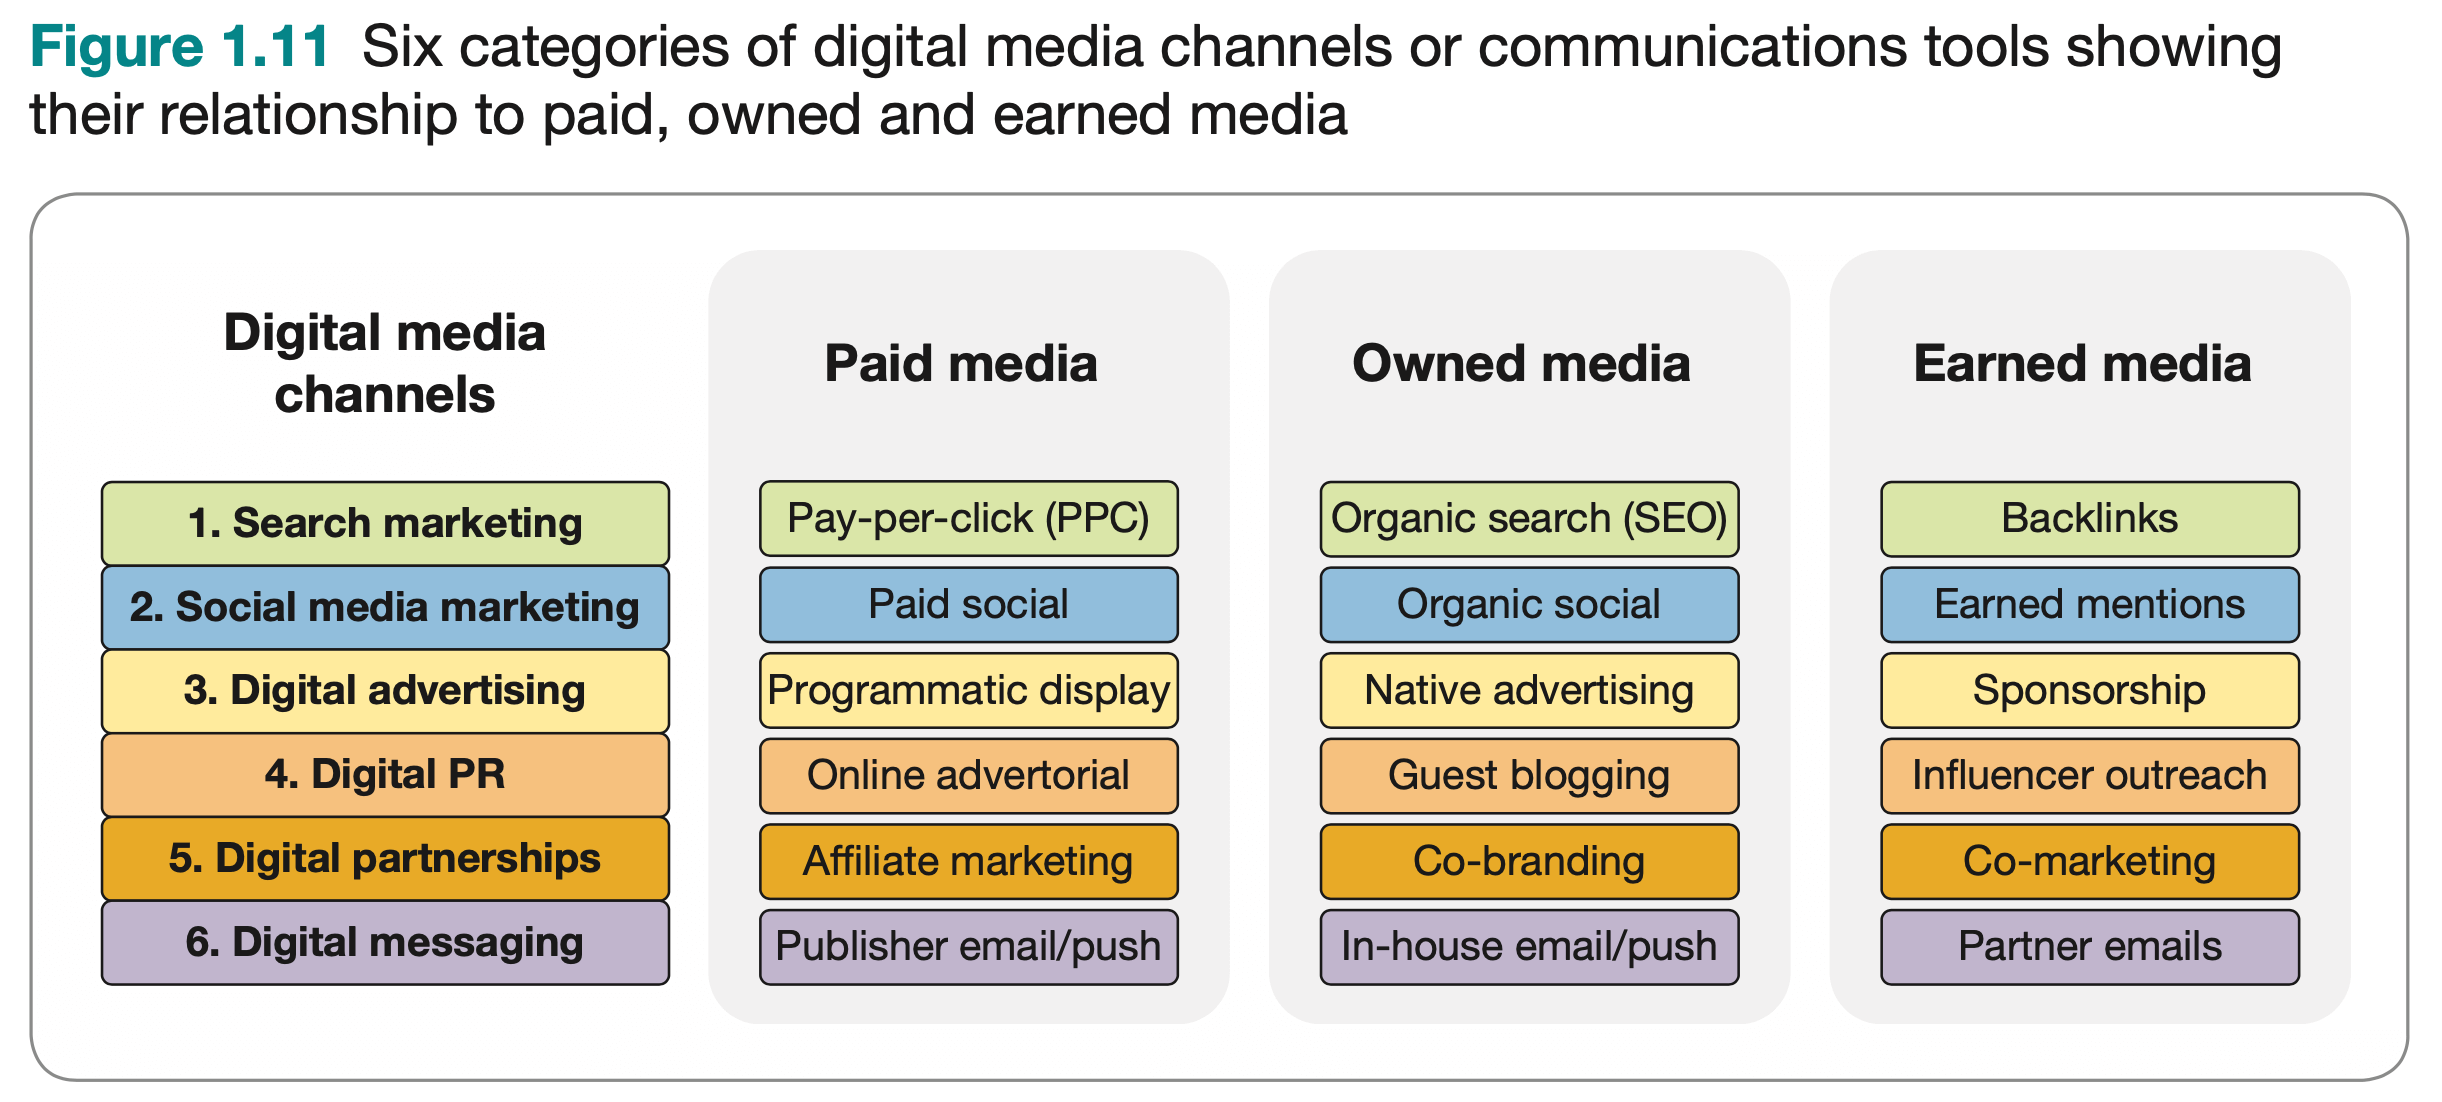
The best strategy is to use a mix of paid, owned, and earned media to reach your audience in different places. (Check out this awesome chart that Smart Insights created to show the different applications of paid, owned, and earned media for different marketing channels!)
As you publish your content in various ways and promote it on various channels, make sure you draw people back to the place where all your content lives. For most businesses, this is your website with a blog. For others, it could be a YouTube channel if most of your content is in video. Wherever it is, you want to lead people to your gold mine and have them fall down the rabbit hole.
Some KPIs you can monitor in this stage include the number of unique visitors to your website, the number of followers on a particular channel, and impressions of a paid ad.
Stage 2: Act
The next step down the funnel is for encouraging customers to take the next step. This is their decisionmaking stage, and you should aim to narrow down their choices and show how your business is the best option. Your content should be relevant to their pain points, inspire them to use your business’ solution, and enable them to make their decision. Ideally, this stage is creating solid leads for your business.
Some KPIs for this stage include the number of leads, your lead conversion rate (if they skip straight to purchase), the amount of time spent on your website, and social media engagement via shares, comments, and likes.
Stage 3: Convert
We’ve reached the most-analyzed part of the funnel: the purchase point. Buyers have made their decision and are moving forward with your products or services. One key aspect of the RACE framework is that even though it’s built for digital marketing, it still tracks offline sales as well as online activity.
A tip for converting your audience to paying customers is to leverage marketing automation tools. You can deploy sophisticated email sequences, retargeting campaigns, abandoned cart messaging, and more. The power of your database can be used to ensure the right audience is converting, leading to satisfied customers.
KPIs for this stage are pretty obvious: sales (both online and offline) and revenue. You can also calculate the average order value to see if your audience is converting on higher-value options.
Stage 4: Engage
This final step of the funnel is my favorite, favorite part! Engaging customers long-term and building loyalty is one of my points of pride in my business. I firmly believe that if I treat my customers like the golden people they are, they will not only return to me and request my services again but also advocate for me in the form of referrals.
Customer advocacy doesn’t just mean referrals, though. Any time one of my happy customers comments on a social media post or gives me a testimonial, they are bolstering my social proof. As we know, social proof pretty much drives all business these days. People trust other people, even if they don’t know them—which is why online reviews can make or break a company’s reputation.
At this stage, KPIs you can use include the number of repeat purchases, the lifetime value of each customer, and customer satisfaction or NPS.
I’ve Got Work to Do…
Writing out this post made me realize that I haven’t applied the RACE framework to my own digital marketing strategy in a while. I have not been as consistent about posting as I should be, and it’s hurting my reach. However, I am killing it at the customer engagement stage, if I may say so!
What do you think? Do you like the RACE framework? What areas can you improve your digital marketing strategy? I’d love to hear from you!

by Sarah K Perlman | May 12, 2023 | Branding, Campaigns, Content Creation, Copywriting, Marketing, Nonprofits, Small Business, Social Media, Video
It can be overwhelming to consider putting together your own content strategy. It’s even more pressure to rely on your content to make an impact on your business goals. If your small business or nonprofit organization can’t afford to hire an experienced marketer, you might wonder how you’ll even get started.
What even IS a content strategy? It’s the intentional plan by which you create and distribute various pieces of content in specific places for your target audience. The key word here is intentional—it’s not a strategy if you are simply throwing things out to see what sticks! Try these steps for building an impactful content strategy for your organization.
1. Outline Your Content Goals
Before you can create a strategy, you need to identify, understand, and document your purpose. This is a major part of being intentional!
Some content marketing goals might be:
- Increase brand awareness among your target audience
- Increase inbound qualified leads
- Position your business as a thought leader in your industry
- Provide a value-added resource to your existing clients
I’m a fan of creating SMART goals. This means that each goal should be specific, measurable, achievable, relevant, and timely. For example, if you want to increase brand awareness, your goal might read like this. “By July 31, 2023, we will increase website pageviews by 5% by creating and publishing consistent content.” At this stage, you can’t exactly outline which content and on which platforms. But you can always go back and revise your goals after you build your strategy.
2. Reinforce Your Brand Foundation
Before you try to engage new and existing audiences, you have to prepare for the questions they will have. Who are you? What do you do? How long have you been around? Why should I care?
Review The 10 Commandments of Branding and, if necessary, reinforce your brand foundation. Make sure you have a clear and strong mission, vision, and values and if possible, write a brand story to guide your content creation. You also should create a brand style guide if you don’t already have one to ensure that you’re creating consistent and accurate content.
3. Identify Your Target Audience
You may think you know who your potential clients are, but it’s a good idea to do some research. Look into your current clients and identify commonalities between them. Are they all a specific type of business or in the same industry? Are your contacts around the same age range or at a specific job title? Ask yourself these and other questions to try and pinpoint your target audience.
Also look into your competition, if possible. Who are they currently working with? Who is their content speaking to? You shouldn’t copy their efforts, but some competitive research can help you formulate your own target audience.
Going one step further, create personas for different segments of your target audience. These personas are specific profiles of an imaginary person that fits into your demographics for each segment. Include each person’s pain points and why they would choose to use your business to solve them. Say your accounting firm has a persona for Carol, who is 45 and struggles with bookkeeping for her small business. You’ll have an easier time creating content that speaks directly to her pain points (and therefore, those of the people like her in your segment).
4. Decide on Content Formats
There are so many formats that you can use to publish content in today’s digital world. Will you write blog posts? Create YouTube videos? Share quick Instagram Reels or TikTok videos? Show vivid images of your work?
This is another area where competitive research can be helpful. Compare your business website and social media channels with others in your industry. You can even look into how they rank on Google and what keywords they’re using. You might find content voids where there is a great opportunity to share a specific type of content that isn’t currently being leveraged.
That said, make sure you are comfortable creating content in your chosen formats. If you can’t imagine getting in front of a camera, don’t say that you’re going to make selfie-style Instagram Reels. Instead, play to your strengths and consider formats that don’t require you to show your face all the time!
5. Select Distribution Platforms
Now that you’ve established who your target audience is, you need to find out where they hang out online. Your content strategy should include social media channels where your target audience is present! You also have to make sure you choose platforms you’re comfortable with. But only so many—if you spread yourself too thin trying to publish on every platform, it won’t end up well.
If you already have social media channels set up, now is a good time to evaluate how well they are working. It’s absolutely allowed to quit a social platform that isn’t giving you the results you need. Don’t waste your limited time on a platform that isn’t serving you!
6. Define Your Production Processes
It’s helpful to define your process for each content format you’ll be creating. Whether you’re a one-woman show or a team of 20, you need to document your process so that you can be consistent, save time, and be ready for others to assist you. (You might not be a one-woman show forever, and it will be much easier to bring on assistance if you already have your process documented.)
Different formats will have different processes for creation and publishing. For example, my video creation process is very different from my blog creation process. Similarly, the tools I use to schedule and publish blogs are different than the tools I use to schedule and publish social media. Take the time to figure out a process that works for you, write it down, and revise it as necessary if you figure out a better way to do things.
7. Decide on a Publishing Schedule
A publishing schedule is critical for holding yourself accountable and staying consistent. If you know that you publish a blog post every Tuesday, then on Friday you know you need to get cracking if you haven’t written one yet. (Although I highly recommend batching your content creation. This just means setting aside a block of time for creating a several pieces of content while you’re in the zone.)
Having a publishing schedule also helps you take advantage of holidays, special events in your industry, and other key dates. You’ll be able to match specific content with these dates and schedule it accordingly. And speaking of scheduling, take this time to research and select a scheduling tool that allows you to “set it and forget it.” You want to avoid having to manually post on certain days or at specific times if at all possible. I use Hootsuite to schedule my social media posts and WordPress to schedule blog posts in advance.
Even with a scheduling tool, you need to be realistic about the time you have to devote to content creation and publishing. Even with marketing tools to help automate your process, you’ll be spending a LOT of time on executing this strategy! It’s OK to start with publishing less frequently and work your way up to posting more often if you find that you have the time and resources to do so.
8. Develop Content Pillars and Subtopics
You’re getting into the fun part now! Having dedicated content topics that you focus on—also called content pillars—makes your creation so much easier. Have a brainstorming session to consider the major topics that you want to focus on.
Remember, these should be adding value to your current clients and target audience. Think about their pain points that you identified when you were building your personas. What are the major topics that someone would search for to help solve them? Smaller topics that relate to your content pillars are your subtopics, and there can be an infinite number of content pieces to discuss them.
You can also post other content, of course. We want to educate, inspire, and entertain our audience! So if you want to post a relatable meme on your social channel, go for it! You can also share content that humanizes your business, like behind the scenes videos or employee spotlights.
9. Create Pieces of Content
We’ve reached my favorite step! I love creating content to share—but that wasn’t always the case. I was nervous about sharing my thoughts and, in some cases, opinions with the world. This is totally understandable and normal! However, you have to take ownership of your expertise, skills, and experience and act like the expert you are.
Since you’ve already identified your content pillars and subtopics, you know where to start. Make a big list of content ideas, even if they are half-baked to start. You can flesh them out and assign them to specific formats and platforms as you go. (Side note: If you’re writing blog posts, I cannot recommend HemingwayApp enough. It is my essential tool for composing clear and readable content!)
Take advantage of research tools to find detailed information to back up your own thoughts. Scour recent headlines and search engine questions to get ideas for timely content in your industry. While current events are trending for a time, make sure you plan for evergreen content as well. This is content about your business or industry that doesn’t change—or at least rarely. These will be blog posts and graphics that you can refer and link to time after time.
You might also consider having guest content as well, especially on your blog. Invite a guest for an interview or even ask them to write a blog post that you can publish on your website. Or on social media, you can partner with another business in a related field within your industry. For example, if you’re a wedding photographer, you can partner with a caterer and tag both companies on Instagram. You’ll gain more exposure to your shared target audience that way.
Remember to repurpose content for different formats and different formats! If you write a blog post, condense your main points and share in a TikTok video with a link to the post in the caption. Make a graphic for your Instagram that relates to the post. It’s OK to mix and match formats using the same content. Your audience is spread out among different platforms, so this will help you reach more people with the same ideas.
Once you start creating content, you want to set up a place to hold it all. Your content library can simply be organized into folders on your computer, saved in an organized Dropbox, or held in a Google drive. Whatever way you choose to save it, make sure it’s organized so that you can find things when you need to.
10. Publish, Engage, and Track
Now you can publish your content—yay! If you’re using a scheduling tool, this is effortless because you’ve already set it up. If you’re publishing manually, that’s OK too. However you need to do it, shake off the nerves and hit post!
Once you’ve sent your content out into the world, watch for engagement and respond accordingly. If someone leaves a comment, acknowledge them! Commenting can sometimes be just as scary as publishing in the first place. You’ll also encourage further engagement if people see that you’re interacting with them.
After your content has been posted for a bit, check the analytics that are built into each platform you’re using. You can check to see how many people viewed it, shared it, etc. This is valuable intel for you to see what kinds of topics and formats resonate with your audience. It’s also going to inform the measurement part of your content goals and the way you evaluate your success.
Eventually, you can perform a content audit on multiple pieces you’ve posted to get an overall view of what’s working best. You also should monitor trends with your competitors’ content for the same reason.
Get Started!
Now that you have a content strategy and a plan for content creation, it’s time to get started! If you need help along the way, feel free to reach out to me for advice and assistance. Happy creating!

by Sarah K Perlman | Feb 20, 2023 | Campaigns, Content Creation, Marketing, Social Media, Video
In recent years, video has become the most compelling media format for most audiences. Specifically, short videos have the capability to engage before the audience loses interest. In fact, according to Woosuite, the short-form video has the highest ROI of any social media marketing strategy at 30%.
When working with clients, I use a 7-step video ad production process to develop the best video for their advertisements. Paired with the strategy to have that video reach the appropriate audience, these videos accomplish great things! Some of these steps have “sub-steps” to them, but the seven below are the main buckets of the process.
Step 1: Hold the Discovery Meeting
Gathering all necessary information at the outset is critical to a successful campaign. If this is a new client, I collect all branding information about the client. I need to understand their mission and values to understand the underlying goals of their marketing. I request access to their logos as well as previous collateral to be able to match their voice (unless we’re pivoting with this campaign).
One of the most important areas is understanding the client’s target audience. Three things we need to know about the target audience: their pain points, what platforms they use, and what content resonates with them. These answers will guide specific messaging as well as dictate which ad platforms we deploy the video on.
Of course, it’s always helpful to determine the client’s ad budget in advance so that we’re prepared later on when it’s time to deploy. This is the amount they are willing to devote to the ad appearing on each platform.
Step 2: Plan the Video
Planning is a seemingly easy task. You just write a script and film it, right? The reality is that there are many moving parts that must come together before you write a single word.
Identifying a speaker (or speakers) will guide the tone of the video. Will it be two people playing off each other’s words? Will it be a single person speaking directly into the camera? Then there is the location to consider. What type of setting is appropriate for your video? Will you need B-roll footage? Or on-screen graphics to overlay onto the video?
Writing the script is often the last piece in the puzzle once all these other questions are answered. But even this task isn’t as simple as it seems. You must write in the brand’s voice but also make it natural for whoever will be delivering the lines. It’s a balance, and takes skill (and usually several drafts) to get it right.
Step 3: Film the Video
Whether you’re filming on a iPhone (don’t laugh, they have great capabilities!) or on a more professional camera, you’ll likely need some extra equipment to achieve the best results. First, test your setup and see whether you need a tripod (yes), auxiliary mics (probably), or other accessories. Plan to use a teleprompter app or cue cards so that the speakers aren’t focused on remembering a long script.
When you’re ready to start shooting, be aware of the lighting and make sure your subject is lit well with no competing light sources. Shoot as many takes as necessary to get your speaker comfortable with the process. While filming, keep in mind where you might have breaks, voiceovers, and B-roll. You can splice different takes together when editing, but only if the splices are at appropriate times.
Be sure to play back your captures onsite so that you can evaluate whether more takes are necessary. Check the video footage, listen to the audio and see if there is unwanted ambient noise, etc. “We’ll fix it in post” is a foolish assumption! It’s much harder to alter the video and audio after the fact than it is to get it right in the moment.
Step 4: Edit the Video and Graphics
I’m a big fan of using Adobe Premiere Pro for video editing, but there are so many professional settings that it can be overwhelming if you’re not used to it. A simpler program, like Adobe Rush, might be easier if you’re just starting out. You won’t have as many options for creating transitions and placing graphics, but there are basic options and captions available.
Whatever editing program you decide to use, hopefully you won’t have to touch up too many areas within the video or audio feeds. At this point, you’ll cut your scenes, insert B-roll and voiceovers, and add any graphics you’ve planned. Make sure you save your working file so that you can edit minor details after all stakeholders have seen the draft!
Step 5: Set Up the Ad(s)
Each platform you use will have different settings for your ad setup. LinkedIn requires different information than Facebook, and both differ from website-specific specifications. However, there are commonalities that you can plan for in advance. Most likely you’ll need a headline, body copy, your video, and a call to action.
Usually you can set either a daily budget or a lifetime budget for the duration of the ad. I like to set a lifetime budget because there is more flexibility in how the ad is shown to users.
You’ll also be able to set up audience parameters in most platforms so that your ad will be seen by the right people! This is a fuzzy area, because often the budget will dictate how many people you target instead of the other way around. Fortunately, most platforms will provide a forecast based on the number of people in your audience and the amount of money you’re spending. Play with your parameters, including geographic location, to find the sweet spot based on your desired results. (For example, if you’re hoping for 50 clicks to your landing page each day, play with the parameters until the forecast is in that range.)
Step 6: Deploy the Ad(s)
Hit publish, submit, whatever! This is the easiest—but possibly most terrifying—step.
Step 7: Track the Ad(s)
Without tracking the performance of your ads, you won’t know how well they are doing and if they were worth it in the first place. Every platform provides analytics to show how many times the ad was seen (impressions), how many individual people saw your ad, how much you spent per day, etc. Some platforms even tell you how much of the video was seen. This is powerful feedback that directly relates to your video content!
I recommend using a landing page to direct people to with your call to action. The landing page might be additional information to expand on your video, or it could be a purchase page if your call to action was directly asking them to buy. It could also be a form that they fill out to receive some free content. Whatever the goal of your ad is, the landing page is where it should happen.
The beauty of the landing page is that you can track exactly how many people went through with the process. This is opposed to the metrics given by the ad platform, which can only tell you that they clicked through to the landing page. If you had 427 people click through but only received 19 forms, I’d conclude that your ad worked wonderfully but your landing page or the offer itself is lacking.
I hope you find this 7-step process helpful! I’d love to hear feedback on your own process and whether this helped!
